Ready to get started? Follow our step-by-step guide to create your ad campaign on the FRAMEN Ads Manager.
🔖 Table of Contents
- Campaign Creation
- Brand Details
- Targeting
- Time & Date
- Creatives
- Budget
- Forecast Report
- Campaign Activation
🚀 Launch your campaign or book a call with our support team.
🎯 Campaign Creation
To get started with your FRAMEN campaign on the FRAMEN dashboard
- Click on Campaigns.
- Click on the New Campaign button on the right side of the page.
- A pop up will appear to enter in your campaign Title and Target Country.
- By clicking on the check box to the bottom left, you can choose to setup your campaign with the linear wizard which will take you through your campaign creation step by step.
- Click on New Campaign.
🎯 Brand Details
To help the FRAMEN algorithm determine the right audience for your business, the first step once you create a campaign is to fill in your business details.
- Click the Add Brand Details button in the bottom left corner.
- Input your Brand name.
- Choose your product or service type.
- If you would like to use the keyed in brand details as the default values for future campaigns, click on the checkbox at the bottom left corner.
- Finally, click Save.
Targeting is the best way to narrow down the most suitable customers for your business. The targeting parameters you select affects the estimated impressions and reach you can expect to receive for your campaign. The predicted performance of your targeting can be seen through the Forecast Report or Campaign Performance Indicator.
In the targeting section of your dashboard, you can target your audience based on countries, specific locations or venue types such as coworking spaces or gyms.
- Target Country: Click on the Target Country dropdown to select the country where you want your ad displayed.
⚙️ Tooltip: Make sure to set up multiple campaigns for every country you wish to target with your ads.
- Geo Targets: If your brand has a global presence and you're looking to promote it in London, you can target specific areas such as Canary Wharf, the bustling business district, while excluding places like Staines, a suburb near London. Learn more>
-
- Include Area/Geospot: To include a specific Area/Geospot, enter it in the Geotargets section.
- Exclude Area/Geospot: To exclude an Area/Geospot, click Include, then choose Exclude from the drop down.
⚙️ Tooltip: Additionally, increase or decrease the radius of the selected area/geospot by clicking on the drop down to the right and selecting the desired distance. You can switch the unit of measurement between metric or imperial in My Settings.
- Map view: Click Open Map to target your audience geographically. You can either type in an area or click directly on the map to include or exclude regions. Learn more>
- ZIP codes: For postcode-based advertising, use the Import ZIP codes button. You can upload postcodes as a CSV file or input them as comma-separated values.
- Venue Type Targeting: Let's narrow down our location choices using a ride-sharing app as an example. You can focus on specific venue types such as airports (for your ride home), retail locations (if you have extra bags), and leisure spots (perhaps after a few drinks). Learn more>
-
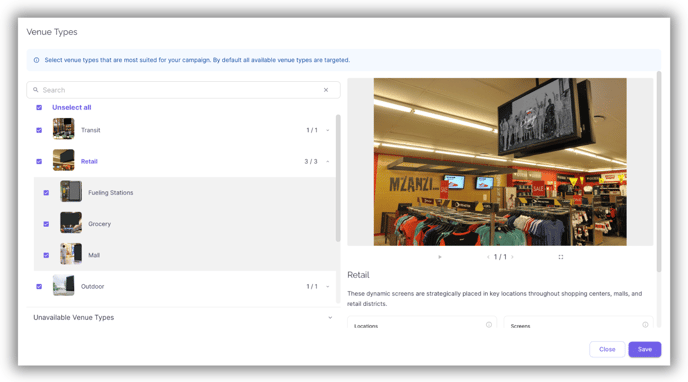
- Click the Select button in the Select your venue types section.
- Browse the available venue types and choose where you'd like to run your ad campaign.
- On the right, you'll see images of the venue along with information about the number of locations, screens, impressions, and available spots for each Venue type.
⚙️Tooltip: When you upload your creative content in the Creatives section, you can then preview your campaign in the Venue Type targeting section or Forecast Report.
🎯 Time & Date
Consider this: your audience is most receptive and open-minded at specific times. Restaurant chains or food brands might opt to feature their ads in coworking spaces, targeting pre-lunch (10 am - 2 pm) and pre-dinner (4 pm - 7 pm) slots, while avoiding weekends when these spaces are closed.
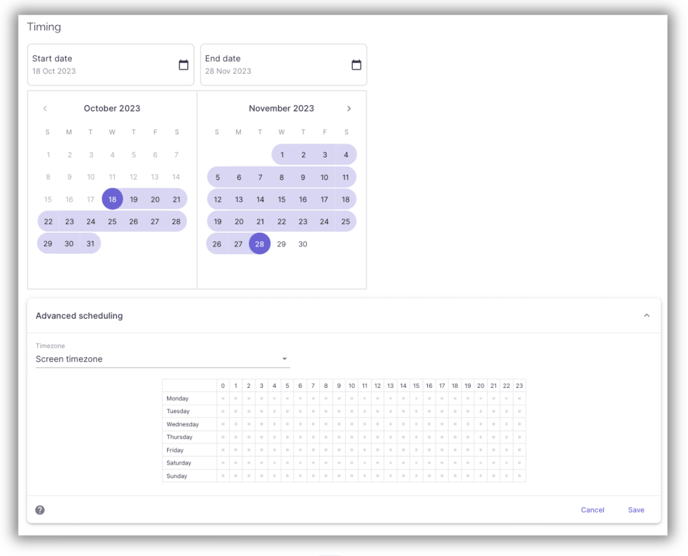
- Date: Select a start date and end date from the calendar to set the run time for your campaign.
- Timing (Optional)
- Click Advanced scheduling.
- Pick your desired time zone from the Screen Timezone dropdown.
- Choose the time frame and days of the week for your ad display.
- To select or unselect all times and days, click the first blank cell.
- To select or unselect an entire day (e.g., Monday, Tuesday), click on that day.
- To choose or deselect a specific time (e.g., 0, 1, 2), click on it.
- To individually select or unselect cells, click on the specific cells.
- Finally, click "Save" to confirm your schedule.

Upload your high-quality creatives for your campaign, and don’t forget to include a way for your audience to connect with you, like a QR code or short link. Here's how you can upload your creative
-
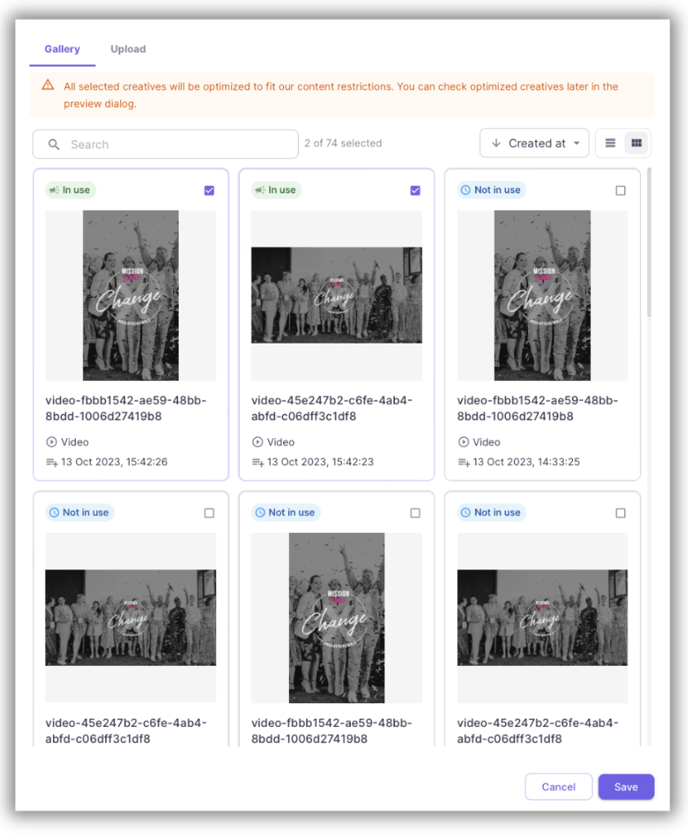
Under the Creatives section, click on Select.
-
You can choose to display an existing creative asset in your gallery, or if you don’t have any saved in your gallery, then select the Upload tab.
-
Drag and drop a creative asset or select one from your device.
-
Click on Upload and Save.
⚙️ Tooltips
- View tips to create the perfect ad creatives for your campaign here.
- View creative specs for your FRAMEN Ad Campaign.
Begin your campaign with just £10/€10/$10. The campaign budget gauges the delivery, and determines the effectiveness of your campaign
- Budget Optimisation: If you’re not sure how much you’re willing to spend on a campaign, don't worry - let the performance indicator guide you to your optimal budget. Learn more>
- Overpaying: If the indicator says you’re overpaying, then it means the budget you have selected is too high, you can choose to broaden your targeting specifications, increase the time period for your campaign or simply reduce your budget.
- Underpaying: If the indicator says you’re underpaying, then it means the budget you have selected is too low, you can choose to narrow down your targeting specifications, reduce the time period for your campaign or simply increase your budget.
⚙️ Tooltip: Modify your budget to observe changes to your impression count.
Before you go live with your campaign, you can view the forecasted performance of your campaign through the Forecast Report. Learn more>
-
KPI: View an overall summary of estimated impressions, locations, spots, screen placements, ad display frequency, and share of voice. You can also check projected impressions over a specific timeframe by adjusting the slider below the Impressions over time graph to analyse your campaign's forecasted performance for different time ranges.
- Venues: View a summary of estimated impressions, locations, spots, screen placements, ad display frequency, and share of voice for different venue types. You can also check projected impressions of a venue over a specific timeframe by adjusting the slider below the Impressions over time graph to analyze campaign performance on various dates.
- Geotargets: Get an overview on the Geotargets and locations targeted
- Creatives: Select your creative or one of the example creatives to preview your ad or example ad at a venue.
Prior to launching your ad, you can verify the campaign creation progress using the progress bar in the campaign setup. Beneath the progress bar, the campaign guide offers optimisation tips and helps you set up your campaign effectively.
-
Once you have filled in and reviewed all details, click on the orange Draft toggle button.
-
A pop up appears with an overview of your campaign performance. Click on Start.
-
The status of your campaign will be moved from Draft to Pending.
-
It takes up to 48 hours for your campaign to move from Pending to Accepted.
⚙️ Note: Location owners have the final decision to accept or reject your campaign creatives. Read more>
Get Started 🚀
Use the FRAMEN Ads Manager to start your advertising campaign, or schedule a call with our sales team for assistance with setting up your FRAMEN campaign.
➡️ Start your campaign on the FRAMEN Ads Manager.
➡️ Book a call with our support team.
➡️ For the latest tips and updates, sign up to our newsletter here.


